Webix Jet framework through the eyes of a freshman. Part 1. Composition and Navigation

In the previous articles from the series “Webix JavaScript library through the eyes of a freshman”, you learned how to create an application based on Webix UI components. In this article, I want to take a closer look at creating a similar application using the architecture and capabilities of the Webix Jet framework, as well as the advantages it gives. The article will be useful for those who are familiar with Webix UI and for beginners because the library code is intuitive and easy to use.
Overview of Webix Jet
Webix is a library of UI components. You don’t need to use additional tools to create a full-fledged application based on Webix UI components. However, as the app expands and grows, it may be difficult to organize its code. The Webix team did its best to solve this problem and developed its own tool for building the application architecture.
The Webix Jet framework allows you to create a very flexible and well-managed single page application using the Model-View pattern. With this approach, the data and visualization logic are clearly separated. Each component is developed and tested separately from the others. There are also ready-made solutions for a number of tasks that are implemented through the API, plugins and configurations.
The architecture of Jet-app is based on the view components. Each component is an independent part of the interface. You may combine modules, reuse them in the different parts of the application and control their display via the URL. You will learn more about working with Webix-jet on the example of creating your own SPA.
Building Webix Jet application
Let’s consider the following tasks:
- Application interface
- Application structure
- Creation and Configuration
- View modules
- Data models
- Localization.
In the Webix UI and Webix Jet documentations, you can look through the components and API of the framework which are used in this article.
You can find the full source code here.
Application interface
Let’s describe the interface of our application and divide it into semantic parts. It is important to do so, as we will develop and store each part in a separate module.
The app interface consists of 3 parts:
- Toolbar
- Sidebar
- Panel of dynamic modules.

The Toolbar is at the top of the screen. It contains a label with the name of the application on the left part and buttons for switching localization on the right part.
The Sidebar is on the left part of the screen and contains a menu for navigating between dynamic modules of the interface.
The Panel of dynamic modules is the core of the application. You can find it in the center of the screen. Here you can see 3 standalone modules each of which containing a specific part of the application interface. They are changed by clicking on the menu options.
Application structure
Our application has the following structure:
- index.html file is the start page and the only HTML file
- sources/myapp.js file contains the necessary settings of the application
- sources/views folder consists of the following files:
top.js file contains the main module, which combines all the elements of interface
toolbar.js file contains the module with a toolbar description
form.js file contains the module with a form description
films.js file contains the dynamic module
users.js file contains the dynamic module
products.js file contains the dynamic module
- sources/models folder contains the modules for operations with a data
- sources/styles folder contains CSS files
- sources/locales folder contains localization modules.
Such code structure allows you to separate and manage different aspects of development into various parts. This is especially important when working with a large amount of code.
We will create the application interface by combining several subview modules into a top.js file. Subviews are the interface modules that are included into other views. They can be “static ”or “dynamic”. Let’s take a closer look at them.
Static subviews are imported using the “import” command and included in the component interface directly. For instance, we will use the static toolbar.js module in the top.js module.
To understand how the dynamic subviews work, it’s important to mention the URL entity in Webix Jet. The URL allows you to form a hierarchy of view modules, display and navigate between them. It is also displayed in the address bar after the domain name and the `/ #! /` special character.
For example, using the URL we can specify the module that is displayed first:
http://localhost:8080/#!/top — the application will display the interface from the top.js file
http://localhost:8080/#!/top/films — the application will display the interface from the top.js and films.js files (if the top.js file has a placeholder for films.js).
We will create 3 dynamic subview modules, each of which is displayed with the corresponding URL segment:
- films.js ( http://localhost:8080/#!/top/films )
- users.js ( http://localhost:8080/#!/top/users )
- products.js ( http://localhost:8080/#!/top/products )
The navigation between dynamic subviews is implemented by changing the URL. For example, if we want to display the users module in the dynamic subviews panel, we will change the current URL to http://localhost:8080/#!/top/users. After this action, we will see the interface from the top.js and users.js files. Switching between the menu options works in the same way.
The URL navigation is convenient because the browser stores the history of visits. When we click on the “Back” button in the browser, we will go to the previous module. The URL also stores the state of the application. If the user switches to the Users tab using the menu option and refreshes the page, the application will display the module from the URL set in the address bar before the refresh.
If you don’t like the way the URL is displayed, you can either remove the special characters from it or hide the URL at all. The functionality of the application won’t be changed.
To read more about URL settings follow the link here.
To read more about using subviews follow the link here.
Creating and Configuring
So, we have analyzed the interface and file structure of our application. Now it’s time to create it. First, it is important to define the necessary settings and include the required tools correctly.
The sources/myapp.js file contains the module with main settings.
Import the CSS styles and JetApp class at the beginning of the file.

Create the MyApp class of our application and inherit it from the base JetApp class. In the class constructor, set the required configurations.
It is recommended to activate the debug mode by setting the debug:true parameter. In this mode, the framework will display all errors that may arise during the development of modules. The advantage of Jet is that errors in single modules do not affect the performance of the entire application. Without debug:true the errors will be hidden.
To set the start page, configure the start parameter and specify the following URL value: start:”/top/films”. On app loading, we will see the top.js main module and films.js dynamic module.
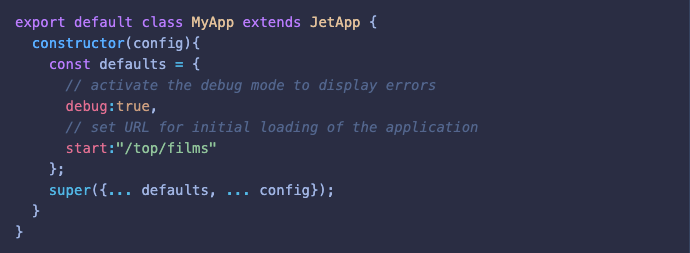
When the app class and its settings are ready, it’s time to initialize it.

Display the application via the render() method and wrap it in the webix.ready() method to load the HTML file before the code is executed.

We have created and configured our application. Now it’s time to move on and create the view modules of the interface.
View Modules
We need to create view components as the ES6 classes and inherit them from the JetView class. This approach allows us to extend the module with built-in JetView methods and gain access to the lifecycle functions of the component.
At the beginning of each module, you need to import the JetView class, which stores settings and tools for managing the logic of the view module.
In our own classes, we use the config() and init() methods, which are inherited from the JetView class. We can also create our own methods to store the custom logic.
Describe elements of the interface and return them via the config() method. The init() method is used for working with data.
Module TopView (top.js)
Let’s define the main TopView module in the top.js file, which includes a sidebar, footer, toolbar and dynamic subview modules. In the address bar, it is displayed as #!/top/.
We will create the toolbar in another module and import it directly. It is included as a static subview.
Import the JetView class and ToolbarView module.

Create and inherit the TopView class from the JetView class. Describe the main elements of the interface and return the combined view via the config() method.

Note that the created class must be exported using the export default command. Otherwise Webix Jet won’t include it in the application.
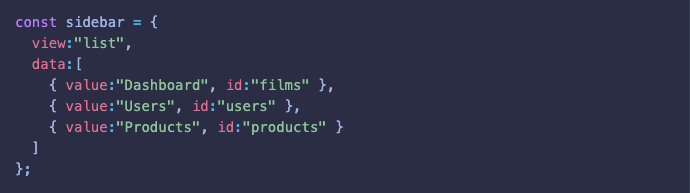
Inside of the config() method we describe a sidebar that contains a menu with options for switching dynamic modules. For this, we use the List component of the Webix UI library. In the “data” property, it is necessary to specify the names of the menu options and their “id”, which are used to generate the URL.
Here we also describe the footer, which contains the copyright information and is located at the very bottom of the screen. It is an insignificant element, so we don’t need to separate it into a standalone module. For this, we use the Template component.

Now we need to combine all the components and form the structure of the application interface. In addition to the sidebar and footer components, we include a static ToolbarView and a placeholder for dynamic subviews.

Within the config() method we return the combined view ui, which includes all the interface elements.
Now we need to provide the logic for switching between dynamic panels (placeholder {$subview:true}).
When you select any menu option, the application will set the required URL segment (films, users, products) and display the module with the corresponding name instead of placeholder {$subview:true}. The “id” of the selected menu option must coincide with the name of the module file to display it correctly.
To set the required URL, we use the built-in this.show(id) method of the JetView class. Pass the id of the corresponding menu option as an argument. This id specifies the URL relative to the module in which the show() method is called. In our case, the method will change the segment of URL after #!/top/ and set the passed id. So the full URL will be #!/top/{id}.
For instance, when you click on the “Users” option, the app will call this.show (“users”) and set the URL #!/top/users. The module of views/users.js file will be displayed instead of {$subview:true} placeholder.
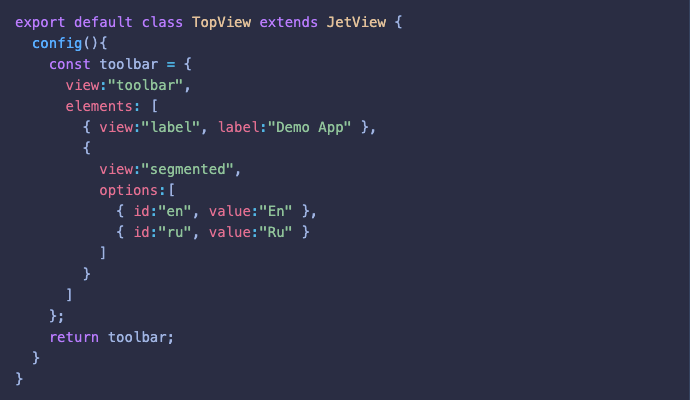
Module ToolbarView (toolbar.js)
Let’s define the ToolbarView module in the toolbar.js file, which is included as a static subview into the top.js file.
The module interface contains a label with the name of the application and buttons for switching languages.
Create and inherit the ToolbarView class from the JetView class. Describe the interface elements and return them via the config() method.
Describe the toolbar using the Toolbar, Label and Segmented components.
Now it’s time to move on and create the dynamic subviews that are changed depending on the URL segment after #!/top/. We have 3 different modules:
- FilmsView
- UsersView
- ProductsView.
Each module is developed in a separate file.
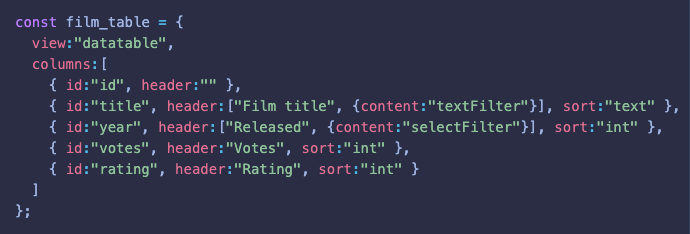
Module FilmsView (films.js)
Let’s define the FilmsView module in the films.js file. It is included as a dynamic subview in the top.js file and displayed if the URL is set to #!/top/films.
The module interface includes a table of films and a form for editing them. The table consists of 5 columns with built-in sorting and filtering capabilities. We will create the form in another module and import it directly. It is included as a static subview.
First of all, import the FormView module from the form.js file, which contains a form for film editing and is included as a static subview.

Then create and inherit the FilmsView class from the basic JetView class. Describe the elements of the interface and return the combined view via the config() method.
Define the table of films using the Datatable component. The columns are configured via the “columns” property. Each column contains a unique “id”. Data sorting is implemented via the “sort” property. We use the sort:“text” setting for columns with text values, and sort:“int” for numeric ones. To add a filter to the column header, use the {content:“textFilter”} setting for text values and {content:“selectFilter”} for numeric values.
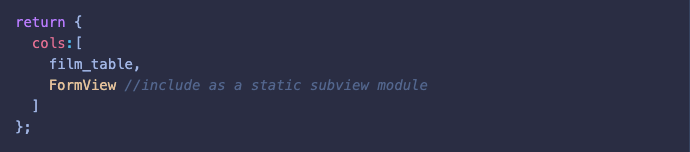
Form the interface of the module. Include the film_table component with the table of films and the static FormView module.
Module FormView (form.js)
Let’s define the FormView module in the form.js file, which is included as a static subview in the films.js file.
The module interface includes a form for editing films. The form consists of 4 input fields, as well as the “Save” and “Clear” buttons.
Create and inherit the FormView class from the JetView class. Describe the interface elements and return them via the config() method.
Describe the form for editing films using the Form component. Configure the input fields and buttons via the “elements” property.

Module UsersView (users.js)
Let’s define the UsersView module in the users.js file. It is included as a dynamic subview in the top.js file and displayed if the URL is set to #!/top/users.
The module interface includes a toolbar, list of users and user chart. The toolbar contains a search bar, a button for adding new users and 2 buttons for sorting the list of users in ascending or descending order.
Create and inherit the UsersView class from the JetView class. Describe the interface elements and return them via the config() method.
Describe the list of users using the List component. Configure the list template, which includes the name, age and country via the “template” property.

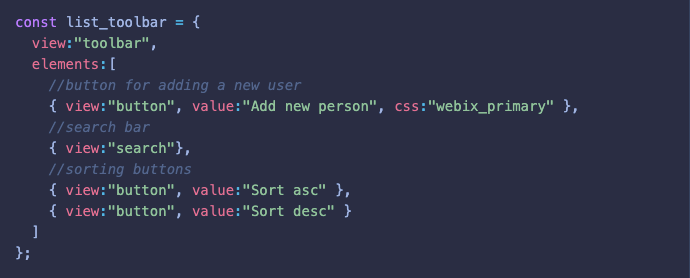
Describe the toolbar for working with the list using the Toolbar component. Configure the search bar and buttons for managing the list of users via the “elements” property.
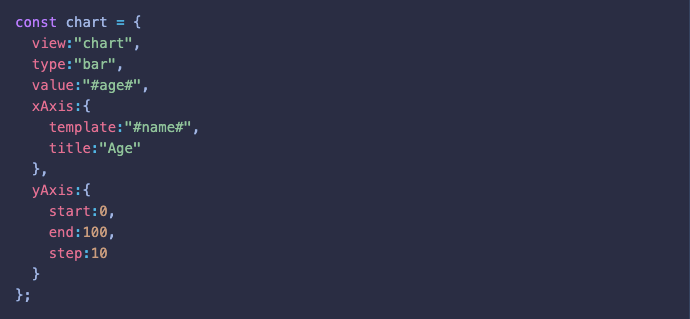
Describe the user chart using the Chart component. Set the chart type via the type:“bar ”property and values for the columns via the value:“#age#” property. Configure the axes using the “xAxis” and “yAxis” properties.
Form the interface of the module. Combine and return the list_toolbar, list and chart components.

Module ProductsView (products.js)
Let’s define the ProductsView module in the products.js file. It is included as a dynamic subview in the top.js file and displayed if the URL is set #!/top/products.
The module interface includes a tree table that contains the elements of different nesting levels.
Create and inherit the ProductsView class from the JetView class. Describe the interface elements and return them via the config() method.
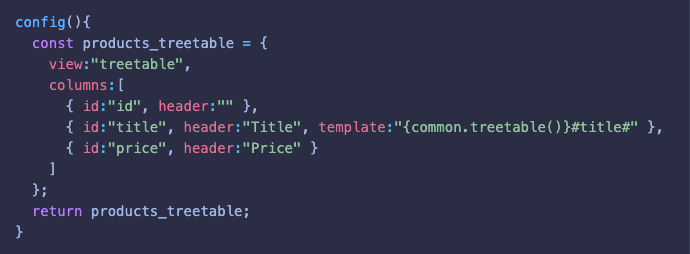
Describe the treetable using the Treetable component. Configure the table columns via the “columns” property.
Use the template:“{common.treetable()}#title#” setting to specify nested elements.
We have described the interface of our application. Now it’s time to figure out how to work with data.
Data Models
Let’s clear up how to work with data models. Actually, you don’t need to provide data models. You can load the data directly into the components bypassing the model, but for a serious application, it is better to separate view and model entities.
The logic for working with data models is stored in the sources/models directory. In the model, we are supposed to interact with the server and load data asynchronously. For this, we use the webix.ajax() method .
The webix.ajax() function makes an asynchronous request to the url specified in the argument and returns a promise object. In case of successful loading, we receive an object, which can be loaded into the modules we need.
We need the data for 3 dynamic subviews:
- FilmsView
- UsersView
- ProductsView.
Create a separate model for each module, for example:

All 3 models differ only by the request argument, which stores the path to the server data. In our case, the data is stored in the ../../data/ folder.
Now we import the getData() method into the corresponding view modules.

After this, we need to pass the data from the model to the required component. The module interface is described inside the config() method and becomes available after initialization. Inside the special init() method of the JetView class we can access the required component (List, Datatable, Chart) and load the data into it using the parse() method.
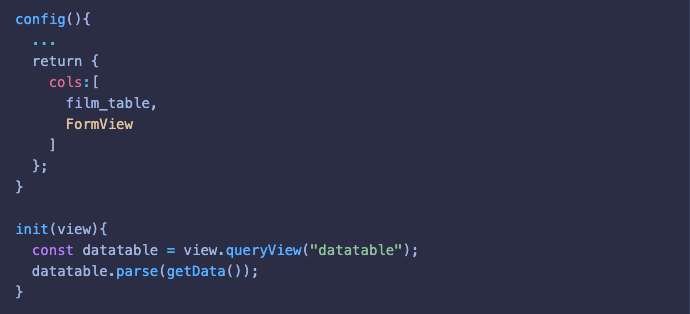
The init() method receives the view parameter, which refers to the object returned by the config() method of the same module. It may be a layout with a table and other components. Inside the layout, we look for the table by the name of the component (view.queryView(“datatable”);) and load the data into it.
To load the data from the promise object which is returned by the getData() method, we need to call the parse() method for the Webix component and pass the promise as an argument.
When the data is loaded, the component will process and display it in the application interface.
Localization
The Webix Jet framework makes it easy to localize the application. For this, we use a built-in Locale service.
We need to include this service in the sources/myapp.js file. After this, it can be used globally for the entire application.
Import the plugins module with all the built-in services, alongside with the JetApp class.

After creating and initializing the MyApp class, it is necessary to connect the plugins.Locale service before the render() method is called.

The Locale service makes use of localization files that are stored in the sources/locales directory. The en.js and ru.js files store the objects with localization elements.

In each separate view module, we get a method from the localization service.

This method is called every time we need to translate any text expression. As an argument, we need to pass the keys by which the values are pulled from the specified locale: _ (“some text”). When the locale is changed, Jet will redraw the application based on the values of the current locale.
We are almost done with it. So it only remains for us to allow the user to switch languages in our application. As you remember, our toolbar contains the Segmented button with the “En ”and “Ru” values. Now we need to create a handler that is called when the corresponding button is clicked. This handler applies the required localization.
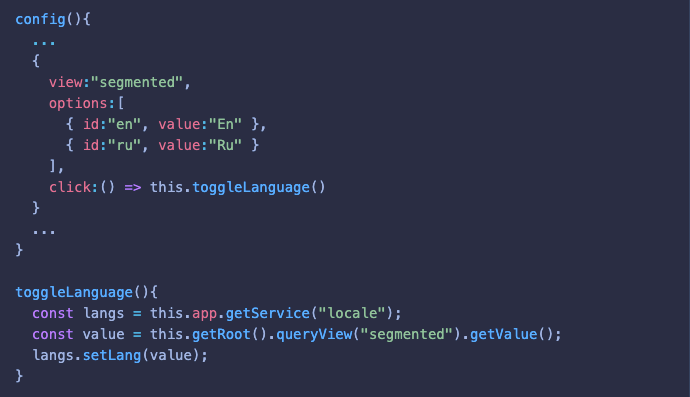
To do this, we create the toggleLanguage() method of the ToolbarView class and call it when the button is clicked.
Inside the method, we access the localization service, read the value of the given option (the value is taken from the id — “en” or “ru”) and set the selected locale using the setLang() method.
We use the this.getRoot() method to get access to the view, which is returned by the config() method of the same module. In this case, it is the Toolbar. Inside the view, we look for a component with the “segmented” name to get the button object and read its value.
These simple manipulations allow switching languages in the Webix Jet application.
Conclusion
With the Webix Jet framework, we have created a structured single page application. The interface is divided into view modules, which are stored in the sources/views directory. The logic for working with data is separated from the interface components and is stored in the sources/models directory. The localization of the application is implemented by using the Locale plugin of the base JetApp class.
Now it is a mini-app, but using this architecture it is easy to extend it and maintain.
You can find the full source code here.
Webix Jet has a fairly wide range of tools and settings that greatly simplify the process of developing an application based on Webix UI components. We will consider Jet features in more detail in the next articles devoted to the Webix Jet framework.