Webix Jet framework through the eyes of a freshman. Part 2. Interaction with the interface

In the previous article “Webix Jet framework through the eyes of a freshman. Part 1. Composition and Navigation” we learned in detail how to create the interface of our application using the Webix UI components. We also split the logic and visual representation between the view modules and data models inside the Jet framework architecture.
In this article we keep on learning the Jet framework and Webix library. Our goal for today is:
- add a bit of interactivity to the application
- define the data models with optimistic and pessimistic approaches for loading and saving data.
You can find the full source code here.
Briefly about Webix and Webix Jet
It bears recalling that Webix is a UI library. You don’t need to use extra tools to create a full-fledged application based on Webix components. But, as the app expands and grows, it may be difficult to organize its code. The Webix team did their best to solve this problem and developed its own tool for building the application architecture.
The Webix Jet framework allows you to create a very flexible and well-managed single-page application. Jet uses the Model-View pattern. With this approach, the logic and visualization are clearly separated. Each component is developed and tested individually. There are also ready-made solutions for a number of tasks that are implemented through the API, plugins and configurations. In this article, we will try to figure out how everything works and also enrich our app with new functionality.
Data Model for Films
Let’s start with the data model for films. We have 2 modules that use the same data: FilmsView and FormView. The first one is a table that displays the film data and the second one is a form for editing. In the interface, the modules look like this:

If two modules use the same data, it would be reasonable to load them once. After this, we can import the data into the required modules when needed. For this, the Webix library provides such an entity as DataCollection. We will use it as the model for working with data.
Let’s create our collection that will serve as a buffer between the view modules and the server:

The DataCollection constructor takes an object with the url and save properties as parameters. The url property stores the path where data are loaded from into the collection when it is initialized.
The save property stores the path to send the changed data by. All the operations (add, update and delete) are sent using the corresponding methods (POST, PUT, DELETE)
So, our data store is ready to use. Let’s import the created model into the FilmsView and FormView modules with the following line

In the FilmsView module we need to load the imported data into the datatable using its parse() method. This is best done after the module is initialized, so let’s do it in the init() method of the JetView class:

Interaction between FilmsView and FormView modules via the URL
Our idea is that the user selects any record in the films table and the film data are automatically displayed in the edit form. At first glance, the task may seem complicated. As you remember, the view components are located in the different modules and know nothing about each other. But in fact, everything is utterly prosaic.
There are several recommended communication methods and one of them is interaction via the URL. With this approach, one module sets a specific value to the url parameter, and the other one reads it. Let’s see how to implement this approach in our case.
Configuring the FilmsView Module
Imagine a situation when the user scrolls through the table and selects the hundredth element. How to preserve this state? We can solve this problem with url. The situation is that when the element is selected in the table, we will set its id as the url parameter. So let’s do it with the setParam() method of the JetView class. It takes 3 arguments:
- the name of the url parameter
- id of the selected element
- true (this argument is responsible for displaying the set url parameter).
In order to implement this, we need to handle the onAfterSelect event for the table and call the above method there. We do this using a special on property:

Now, when we click on any record in the table, we will see its id in the url parameter. In the address bar it looks like this:
http://localhost:8080/#!/Top/films?Id=100
We have preserved the state, and now let’s keep the selected item selected even after page reload.
In order to implement this, we need to read the id value from the url parameter and select the corresponding element in the table.
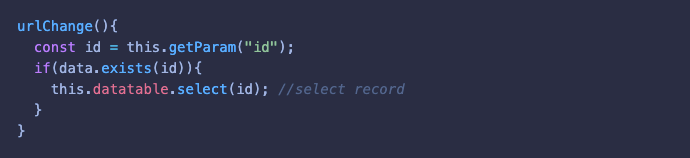
For these purposes, JetView has the urlChange() method. It is called whenever the url is changed. In the body of this method, we get the id value using such a JetView method as getParam(). After this, we need to check the existence of the record with such id in our data collection and then select the record in the table.
It looks like this:
So now we can complicate the task. Let’s imagine that the user has just loaded the page and has not yet selected any element. What will happen in this case? You should remember that the table is connected with the collection. So let’s select the first element of the table.
To do this, we need to go back to the urlChange() method and modify it a bit. To get the id of the first element, the collection has the getFirstId() method. So now the code looks like this:
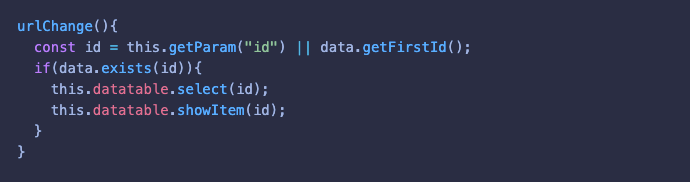
In this state, the method reads and checks the id value from the url parameter. If it is not set, the method will get the first element id of the collection. After this, the method selects the required element in the table with its select() method. It also scrolls the table to the selected record using the showItem() method. This is useful if the table has a lot of records.
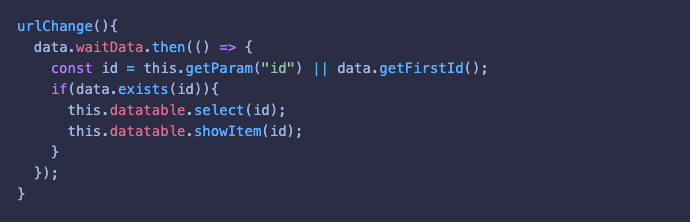
Everything works as expected now. There is one small nuance left. If the data hasn’t been loaded, our idea may not work, since the table is still empty. It should be mentioned here, that all data components, including the collection, have the waitData property. This property stores the promise object of the loaded data. So, let’s take advantage of this and wait until the data is fully loaded into the collection. After this, we perform the needed actions. Ultimately the urlChange() method looks like this:
If you have any questions, do not hesitate and ask them in the comments. And now let’s proceed to the edit form.
Configuring the FormView Module
As we decided earlier, if the user selects any record in the films table, the film data should be displayed in the form fields of the FormView module.
As you remember, the id of the selected element is stored in the url parameter and changed according to the selected record. Let’s catch its change in our urlChange() method and use it as intended:
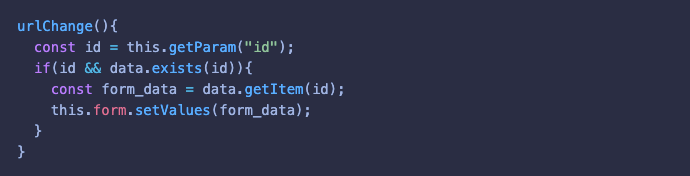
As in the example with the FilmsView module, we get the id value from the url parameter using the JetView getParam() method. Next, we need to check whether the record with the specified id exists in our data collection. If all the conditions are met, we need to get to the collection data and set them into the corresponding form fields.
To get the required collection record by id, we need to call its getItem() method and pass the id of the required item as a parameter.
Next, we set the object data to the corresponding form fields using the form setValues() method. It should be noted that the name property of each form field must coincide with the keys. We use these keys to get corresponding data from the object.
After initial loading, the first element of the table is selected and the form is filled with the corresponding data. When we select another record and then reload the page, the film is still selected and the form fields are filled with its data. So now we know how to set up communication between the view components of the different modules. For this, we use the url and methods for working with it.
Working with data via the collection
Now let’s figure out how to set up saving, updating and deleting films. We already have a data model and the form interacts with the table via the url. As the data model, we use Webix DataCollection. It is responsible for all operations with data.
As you remember, for the collection we set the path to the server script through the save property. This path is used to send requests to change data on the server:

But how can the collection send requests?
As in the case with other Webix data widgets, the save property of the collection ensures the automation of server requests. Whenever the data is added, updated or deleted, the collection sends the corresponding request to the server itself.
Please, note that this is an “optimistic approach”. First, the data is changed in the collection itself (as well as in the widgets synchronized with the collection). After this the request ships to the server. The client-side doesn’t wait for a response from the server and updates the data immediately. This approach significantly speeds up the application. However, if the server responds with an error, we will need to handle this error and inform the user about it.
Now let’s go directly to the operations themselves.
As you remember, our form is in the FormView module. Let me remind you that the form gets the data when the user selects any record in the table. What should happen next? That’s right, the user should edit the data and send them to the collection when clicking on the “Save” button. To do this, we need to create a handler. Let’s do it:

Here we get an object with the form values using the familiar getValues() method and run the validation using the validate() method. If it is successful, we will check the existence of this data in the collection with the corresponding exists() method.
To update data in the collection, we can use its updateItem() method. As an argument, we need to pass the data id and the data object itself:

It looks pretty good. Let’s set our handler for the “Save” button click event. For this we use a special click property:

The handler is set, so it remains to check how everything works. We select any record in the table and edit the data in the form. After this, we save it back to the collection when clicking on the “Save” button. As you remember, the table is synced with the collection. So its updated data will immediately appear in the interface.
By now I hope it is clear how to update the existing data. What about adding the new data? This is even easier. Let’s consider a scenario so that after clearing the form, the newly entered data is added to the beginning of the table. First, let’s create a handler that clears the form when clicking on the “Clear” button:

Now, we have to set a handler for the click event of the corresponding button:

After clearing the form, we can enter the new data and try to save them. There will be no result because our saveFilmHandler() handler is configured only to update an existing record by its id. Let’s change it a bit and add the add() method which sends new data to the collection. Now, this handler looks like this:
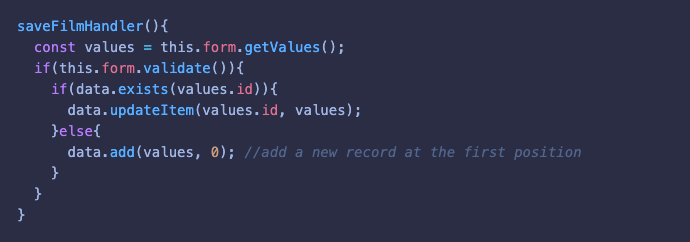
The add() method takes the object with data and the element position in the table. Now all that remains is to check the result. So we clear the form, enter new data and save it by clicking on the “Save” button. New data will be displayed at the beginning of the table.
That’s it, the form is ready. The data is updated and added, but it feels like something is missing. That’s right, we forgot about deleting data.
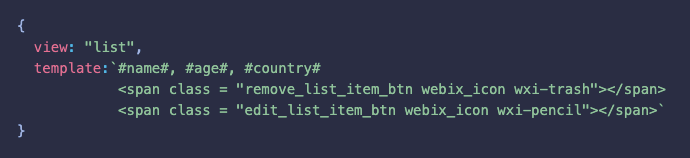
Let’s implement deleting via the table. For this case, we add a special icon to the last column and set the corresponding handler on it.
To add the icon, go to the column settings and add the following object into the array of the columns property:

The template property sets the template for the column cell. The common.trashIcon() inserts the corresponding icon. In the interface, it looks like this:

Now let’s define the behavior upon clicking on this icon. For such cases, the table has the onClick property. With its help, we can set a handler for any element of the table referring to its css class. In our case, it is “wxi-trash”. The handler looks like this:

Now let’s go directly to the actions and delete data when clicking on the icon. To remove data, the collection has a special remove() method. As a parameter, we need to pass the id of the desired element. So now the handler looks like this:

To summarize, in this section we examined how data operations are implemented when working with a collection. Let me remind you that here we have used the “optimistic approach” of data saving. The request is sent to the server after the data has been updated in the view components. This increases the speed of the application.
Data Model for Users
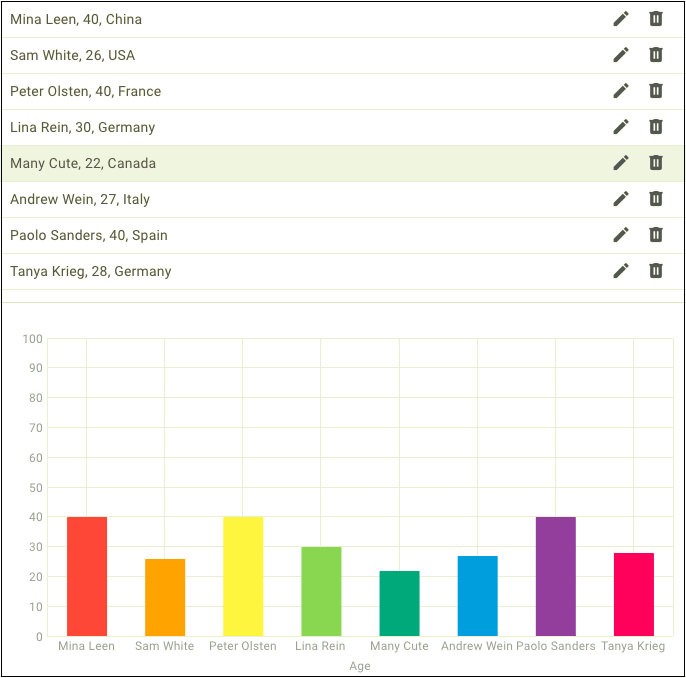
Now let’s recall that our application has a second tab with a UsersView module. It stores a list of users and a diagram. In the interface, it looks like this:
For these two view components, we also use server-side data. Since they are in the same module, we don’t need to create a special collection. Let’s go the other way and set up loading/saving data using the corresponding model functions:
- getData()
- saveData()
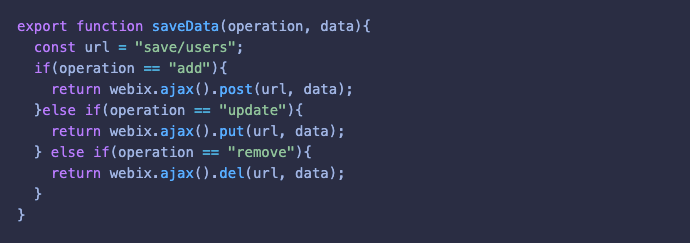
The getData() function will only load data. It looks like this:

Depending on the type of operation (add, update or delete), the saveData() function will send requests to change data to the server. For each operation, we use different methods (POST, PUT, DEL). It looks like this:
So, we have defined the data model functions. Now we need to import them into the UsersView module with the following line:

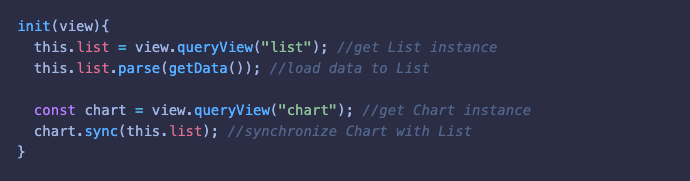
After that, we need to load the data into the list using the parse() method. We also need to synchronize the diagram with the list using the sync() method. All this we do after initialization in the init() method:
Interaction via the class methods and global events
WebixJet also offers other communication approaches between components of different modules. Let’s look at the way to interact via the class methods and global events. We also apply them to the modules of our application.
You probably know that we can call any public method of one class inside another. Based on this feature, we implement the interaction between the modules.
Also, Jet App allows you to trigger any event in one module and read it in any other one. Sounds good, so let’s figure out how all this can be applied to our application (in particular to the UsersView module).
When you click on the “Add” button on the toolbar, a pop-up window with an edit form should appear in the response. First, let’s create this window and define the method to display it.
Create a Popup Window with a Form
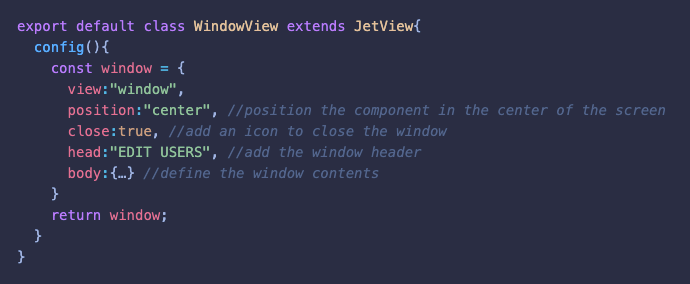
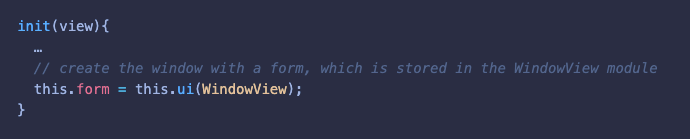
To create a popup window, we don’t need to reinvent the wheel. Webix has foreseen this case and provided us with such a component as a window. Let’s create a separate WindowView module in the views/window.js file. Here we should describe this component.
Create the WindowView class and inherit it from the JetView class. In the config() method, we describe and return the window component:
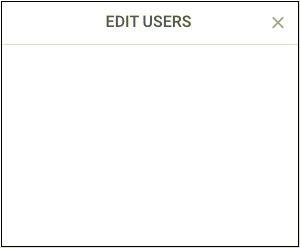
In the browser, we get the following result:
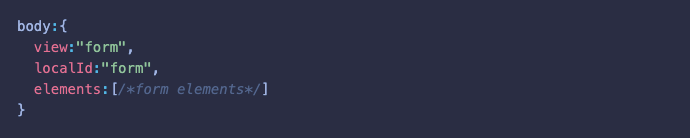
Now we need to add the form for editing user data. This is implemented in the object of the body property using the form component:
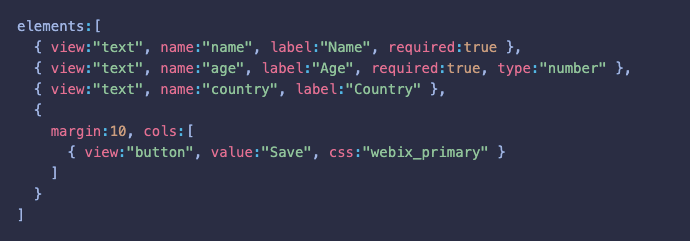
In the array of the elements property, define the required form fields:
Now the pop-up window with the form looks like this:

By default, Webix windows are hidden. We need to display the window with a form when clicking on the “Add new” button in the toolbar of the UsersView module. Let’s define a method of the WindowView module which displays the window:

In the body of the method, we use the JetView getRoot() method to access the view component. The popup window is stored in the WindowView module. Next, we display the window with its show() method.
So, we have described the popup window and created a method to display it. Let’s see how to use this in another module.
Setting up interaction via the methods
We have the WindowView module with a popup form interface and the method to display it. Now we need to import this module into UsersView and create the window instance there.
At the beginning of the view/users.js file, we import the window module into the UsersView with the following line:

In the JetView init() method of the UsersView class we create an instance of the window. The window includes the form. After we initialized the window, we can show it with the showWindow() method. It is implemented as follows:
Let’s take advantage of this and set the showWindow() method as a handler for the click event on the “Add new” button. We do this using the familiar click property, which is provided for buttons for such cases:

Now, if we click on the “Add new” button, the application will display a pop-up window with a form for editing user data. In such a simple way, we set up the interaction between the components of two modules. For this we use a public method of the class.
Setting up interaction via global events
Now we can show a pop-up window with a form and enter data there. Let’s pass the form values to the UsersView module when clicking on the “Save” button. And we will implement this with the help of global events.
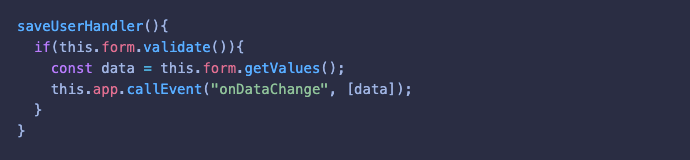
For this, we need to go back to the WindowView module and create an appropriate handler. This handler receives the form values and sends them along with the global event:

As we can see, this is quite simple to implement. To create and dispatch an event, we need to call the this.app.callEvent() method in the context of the whole application (this.app). This method takes the event name and data object as parameters.
To get an object with the form values, we use its getValues() method. It is also worth mentioning here that when we created the form, we specified the localId property to “form”. This will allow us to access the form. In our case, we need to use it several times. So it would be logical to save access to a variable. It would be available only within the current module. It is desirable to do in the JetView init() method, which stores the logic for execution after the module is initialized:

So now the form is available through the this.form variable. It is necessary to consider that the form has 2 special rules (the fields must be filled in). Let’s check them with the validate() method, which returns true or false, for success or failure:
After all, we need to hide the window. For this, the window has the hide() method. As a result, our handler looks like this:
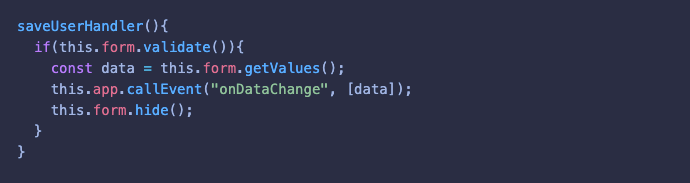
Let’s set this handler for the click event on the “Save” button. Let me remind you that for such cases, Webix buttons have a special click property:

Now, if the user clicks on the “Save” button, the WindowView module will dispatch a global event along with the form values object. We need to catch this event and receive the object in the UsersView module. After this, we need to send data to the server using the model function. Let’s do it.
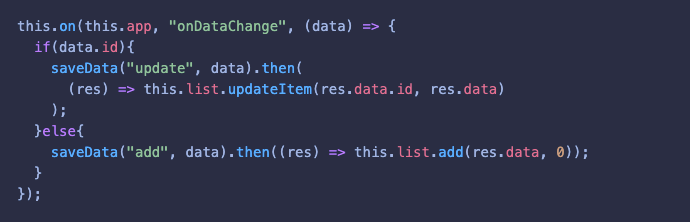
Since the event is a small beast, we don’t need to use rifles and shotguns. It would be enough to set a special trap that reacts to its appearance. The best place to do it is the init() method:
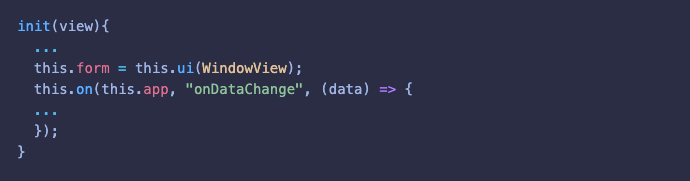
We use the JetView this.on() method to catch the onDataChange event and get the object with form values. After this, we need to perform some actions in the callback.
As we can see, one module dispatches the event and the other catches it. This is how the interaction between modules implements via global events.
Working with data via the model function
We have created the data model functions and imported them. We have also set up the interaction between the WindowView and UsersView modules. For this, we used class methods and global events. Now let’s take a look at how the data are actually moved between the interface components and the server via our saveData() function.
In the beginning, we mentioned the “optimistic approach” in data saving. It would be logical to assume that there is also a “pessimistic” one.
The “pessimistic approach” has a lot of advantages. In order to change the data, first we need to make a request to the server and wait for a response. Only if it is successful, we update the data in the view components. In fact, this is the most reliable way to save data. This approach is closest to a real server, which may have its own logic, access levels and other nuances.
Let’s see how data operations are implemented in the UsersView module.
Adding new User Data
So, our user displayed the form, entered the necessary data and clicked on the “Save” button. Via the global event, the data came from the WindowView module to the UsersView module. These data are available in the handler that caught the event. Now we need to send these data to the server. How to do it? Let’s use the saveData() function from the model. The function takes the name of the operation and the object with the data itself as parameters:

Now the model function can send data to the server and patiently wait for a response. If the data was successfully saved to the server, the method will return a promise object with the server id. We load this object to the list using its add() method. This method takes the object with data and the element position in the list as parameters.
We check the result and see how everything works. After the data is successfully saved on the server, we can see user data at the beginning of the list. But this is not enough for us. Let’s implement the ability to update and delete data.
Updating User Data
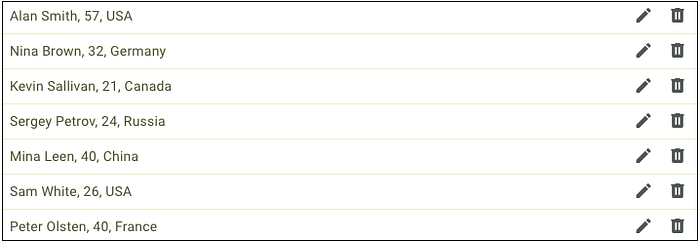
To do this, we need to go back to the list settings and make some changes in its template. Let’s define 2 icons for editing and deleting. Later we will create the corresponding handlers for these buttons. In the code the template looks like this:
And in the browser we get the following result:
So, we have prepared the interface. Now, let’s implement the data update.
The idea is next: when the user clicks on the edit icon, the app will display the form with user data. The data are saved upon clicking the “Save” button and the corresponding changes are reflected in the list. Let’s do it.
First, let’s create and set the handler that displays a popup window with a form when clicking on the edit icon. The list also has the onClick property, which allows setting a handler on any element with a specified css class. As you remember, we assigned the edit_list_item_btn class to the edit icon:
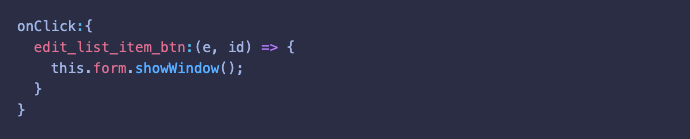
Now, when we click on the edit icon, the application will display a pop-up window with a form, but its fields will be empty. We need to fill the form with data from the selected item. Let’s get this data and pass them into the showWindow().
To get the required data, we use the getItem() method of the list. In this case the method takes the id of the element being edited:
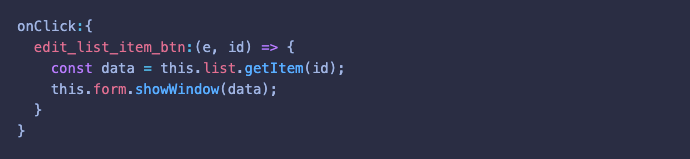
But that’s not all. The form fields are still empty. It is because the showWindow() method does nothing with our argument yet. To change this, we need to go back to the WindowView module and provide a data object as a parameter. If the data are passed, we will set them into the form fields using the setValues() method:

Now, when we click on the edit icon opposite any item in the list, we will see the form. Its fields are filled with the corresponding data. It should also be mentioned that along with the data for the fields, we also pass the id of the element being edited. This id is the key to the data in the list and on the server.
Let’s send this data to the server when the user clicks on the “Save” button. If the id exists, the method will update the data, if not, add new ones. In practice it looks as follows:
Updating data is similar to adding. The model method sends a request to the server and waits for a response. If everything goes well, the method returns a promise object with the changed data. After this we update the data in the list using its updateItem() method. It takes the id and the data object.
Deleting User Data
Now let’s get down to deleting data. As you remember, in the list interface we created a special icon. We also assigned the remove_list_item_btn class to it. Now we need to set a handler that sends a request to delete data. It looks like this:
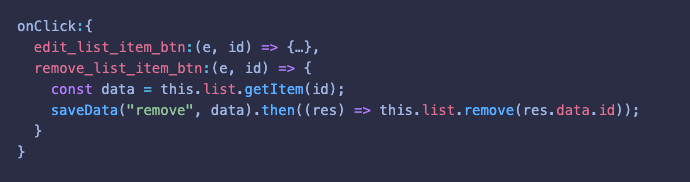
Here we get an object with data and send a delete request via the saveData() model function. If the server approves our request, we will remove the user data from the list using its remove() method. It takes the id of the element being deleted.
To summarize, in this section we figured out how to perform operations with data (add, update and delete) via the model function. Let me remind you that this is a “pessimistic approach” to data saving. The module calls the saveData() function, (which) that sends a request to the server and waits for a response. If the answer is “Yes”, we will change the data in the interface.
Searching and Sorting
We have implemented the main functionality. But if you look closely, you will notice that the search bar and sorting buttons were left without attention. Let’s make them functional.

When we enter some text in the search field, the list data are filtered. To put in place this functionality, we use the filter() method of the list. It compares the search bar values with the list data and displays only matched data.
Sorting is done via the sort() method of the list. It sorts the list data by username in the specified order (ascending or descending).
Conclusion
We have created a full-fledged single-page application using the capabilities of the Jet framework. We also used the methods and components of the Webix library. The interface is divided into view modules. They are stored in a separate sources/views directory. The logic for working with data is also separated from the interface components. It is stored in the sources/models directory.
You can find the full source code here.
In this article, we learned in detail how to set communication between view components. For this, we used URL, global events and public methods of the class. We also slightly touched upon the philosophy of data saving.
Webix Jet has a huge set of tools and configurations that are impossible to cover in one article and implement in one application. It is hard to argue with the fact that using the Webix library and the Jet framework simplifies the developing process.